
Choosing the right Car Seal Strip is not a cosmetic decision. It affects cabin noise, water resistance, door closing force, and long-term comfort. A poor profile may look acceptable in a showroom. It can still shrink, harden, or whistle after one winter.
Industry reports from Grand View Research and Fortune Business Insights show steady growth in automotive sealing demand. Their findings connect this growth with stricter comfort expectations, electric vehicles, and improved body sealing. However, market growth does not make every seal suitable. Buyers must compare rubber type, profile geometry, compression ratio, temperature range, and installation method. SAE J200 material classifications and ISO 3302-1 dimensional tolerances offer useful technical references. They are not complete answers.
Dr. John L. White, a respected rubber technology researcher, described a practical engineering principle: “Material choice cannot be separated from service conditions.” That warning fits Car Seal Strip selection precisely. EPDM often suits weather exposure, while silicone performs better in wider temperature conditions. TPE can support flexible designs, but its performance depends heavily on formulation and processing. Measure the channel first. Check the actual compression. Test the strip against dust, water, and repeated door movement.
Small details matter. A millimeter can change the closing effort. Adhesive backing can fail on oily paint. Clips can leave gaps. We should also admit one uncomfortable point: supplier data may look impressive without independent testing. Ask for test results, batch information, and installation guidance. The best choice is not always the cheapest or thickest strip. It is the one that fits the vehicle, environment, and maintenance reality.
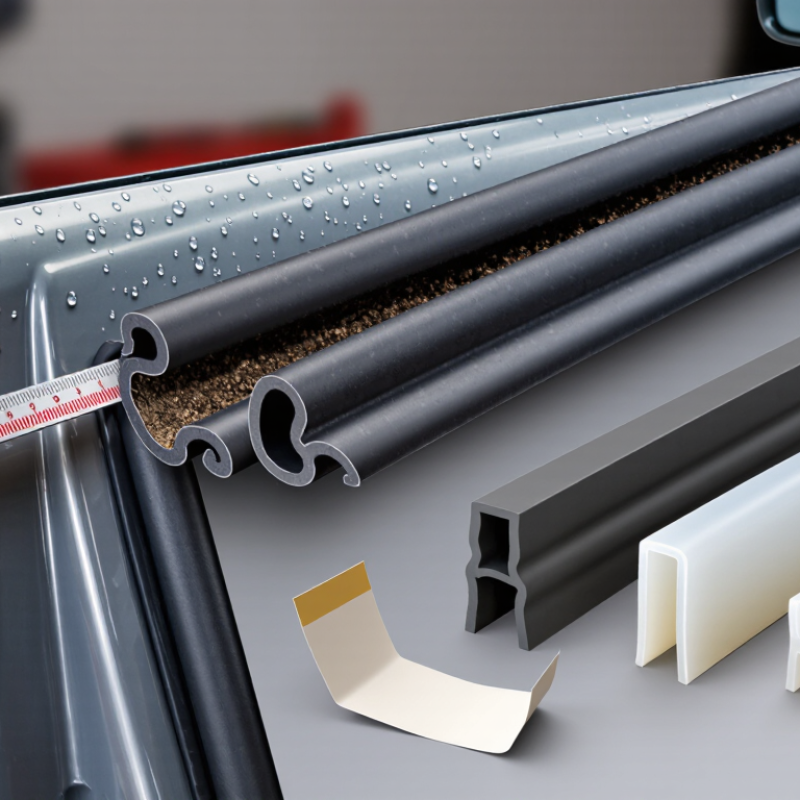
Car seal strips close the gaps around doors, windows, trunks, and hoods. They help block rain, dust, wind noise, and vibration. A well-fitted strip also reduces rattling on uneven roads. In practical inspections, a damaged seal often shows flattened edges, cracks, or water marks on the interior trim.
Common types include door frame seals, glass run channels, trunk seals, and hood seals. EPDM rubber handles changing temperatures and regular exposure to moisture. Silicone stays flexible in demanding conditions, but it may cost more. PVC can work for selected applications, although it may harden sooner in harsh weather. The profile must match the vehicle’s channel. Shape matters.
A useful check involves the original groove, compression level, and corner shape. A seal that feels too thick may prevent the door from closing smoothly. One that is too thin may allow water through. Clean the mounting surface before installation, then press the strip evenly around corners. Avoid stretching it. Stretching can create gaps later.
Small details matter. Test the door several times and spray a light stream of water over the seal. Listen for wind noise during a short drive. I have found that visual checks alone can be misleading. A strip may look secure but still leak near a sharp corner. Rechecking after installation is worth the extra time.
Choosing the right car seal strip starts with inspecting each opening, not guessing from a product photo. Close the door slowly and look for uneven gaps, wind noise, dust marks, or visible daylight. Run your fingers along the old seal. Brittle rubber, flattened sections, and small tears indicate replacement needs.
Doors usually require flexible sealing that compresses without resisting closure. Measure the channel width and the seal’s profile before ordering. A strip that is too thick may leave the door slightly open. Test the window separately. The glass must move smoothly without catching, and the seal should not block drainage paths. Check both front and rear windows because their shapes can differ.
The trunk needs special attention. Place a sheet of paper between the seal and the lid, then close it gently. Pull the paper out and compare resistance around the perimeter. Weak resistance may reveal a poor contact area. Excessive resistance may signal an oversized strip or a misaligned lid. Clean the channel before installation and allow the material to settle naturally.
Small details matter.
I once focused too much on length and overlooked the corner shape. The strip fit, but the trunk still leaked during heavy rain. Rechecking the compression pattern exposed the mistake. For dependable results, compare measurements, closure force, and drainage design for every opening.
| Vehicle Area | What to Check | Recommended Seal Type | Common Material | Typical Requirements | How to Measure or Test | Replacement Indicators |
|---|---|---|---|---|---|---|
| Front and rear doors | Inspect the complete door perimeter, especially the upper corners, hinge side, and latch side. | Push-on or adhesive-backed perimeter weatherstrip with the correct mounting channel. | EPDM rubber is generally preferred for outdoor automotive sealing. | The seal should compress evenly when the door is closed without preventing the latch from engaging. | Close the door on a strip of paper at several points. Consistent resistance suggests more even contact. | Water leaks, wind noise, visible gaps, hardened rubber, tears, flattening, or loose sections. |
| Door frame corners | Check whether the original seal uses molded corners, joints, clips, or a continuous profile. | A flexible profile for straight sections; molded or carefully joined sections for tight corners. | EPDM or flexible thermoplastic elastomer. | The profile must bend without buckling, twisting, or pulling away from the corner. | Compare the new profile with the old cross-section and check corner radius before cutting. | Open joints, corner shrinkage, cracked bends, or a seal that lifts after installation. |
| Window glass perimeter | Determine whether the glass is fixed or moves vertically inside a window channel. | Use a fixed-glass seal for stationary glass; do not use a simple adhesive strip in a moving channel. | EPDM, rubber, or a vehicle-specific glass channel material. | The seal must hold the glass securely while allowing the required movement or installation clearance. | Measure the glass thickness and channel width; confirm that the replacement profile matches both. | Glass movement, rattling, water entry, detached trim, or cracked and shrinking rubber. |
| Window run channel | Inspect the vertical guides and upper window frame for friction, wear, and obstruction. | Flocked or low-friction glass-run channel designed for sliding glass. | EPDM or thermoplastic rubber with a low-friction inner surface. | The glass should move smoothly without excessive drag or loss of weather protection. | Check the channel opening, retaining legs, and glass thickness; test the window before final fastening. | Slow or uneven window operation, rattling glass, worn flocking, or repeated water leaks. |
| Door beltline | Check the outer and inner strips where the window enters the door. | Beltline scraper or glass-run seal with the correct mounting clip arrangement. | Rubber or thermoplastic elastomer with a rigid or semi-rigid carrier. | It should wipe water from the glass without scratching or excessively resisting movement. | Measure the door length and inspect the original clips, lip angle, and contact position. | Scratched glass, water inside the door, loose trim, torn wiping lip, or missing clips. |
| Trunk or liftgate opening | Inspect the full opening, including the lower sill, corners, latch area, and hinge-side sections. | Hollow bulb seal or compression seal with an appropriate mounting channel. | EPDM rubber, commonly used for weather, ozone, and temperature resistance. | The trunk should close fully and latch securely while maintaining continuous compression. | Measure the opening perimeter plus a small installation allowance; avoid stretching the seal during fitting. | Wet luggage compartment, dust entry, exhaust odor, flattened bulb, splits, or difficult closing. |
| Trunk lid or liftgate corners | Look for gaps created by sharp bends, joins, or incorrect seal orientation. | A profile with sufficient flexibility or molded corner sections. | Flexible EPDM or a compatible automotive elastomer. | The seal should remain upright and continuous around corners without folding inward. | Dry-fit the seal around both corners before applying adhesive or fully seating the channel. | Corner gaps, pinched sections, seal rollover, or visible water tracks after washing. |
| Mounting surface | Identify whether the vehicle has a pinch-weld flange, adhesive surface, retaining groove, or clips. | Select a seal whose mounting method matches the existing body structure. | EPDM with a metal or polymer carrier for push-on applications; rubber or foam for adhesive applications. | The mounting base must fit securely without excessive force or deformation. | Measure flange thickness, groove width, and available mounting depth using a ruler or caliper. | Seal movement, adhesive failure, exposed metal, missing retainers, or repeated detachment. |
| Climate and exposure | Consider sunlight, rain, snow, road salt, dust, temperature changes, and cleaning chemicals. | Use an automotive-grade profile specified for exterior weather exposure. | EPDM is commonly selected for resistance to weathering, ozone, and temperature variation. | The material should remain flexible and stable throughout the vehicle’s normal operating environment. | Check the material specification and inspect for surface cracking, gloss loss, or hardening. | Brittleness, chalking, surface cracks, swelling, stickiness, or permanent deformation. |
| Final fit and function test | Confirm door, window, trunk, and liftgate operation after installation. | Use the correctly matched profile rather than choosing only by appearance or outside width. | Material and profile must be compatible with the vehicle’s original mounting design. | Panels must close and latch normally; windows must move smoothly; sealing contact should be continuous. | Perform a paper-contact check, gentle water test, and road-noise inspection after installation. | Any remaining leak, abnormal closing force, wind noise, glass drag, or seal displacement. |
Comparing Seal Strip Materials, Profiles, and Weather Resistance
Choosing a car seal strip starts with the material, not its appearance. EPDM rubber performs well against rain, sunlight, ozone, and changing temperatures. It remains flexible during cold mornings and resists cracking near hot engine compartments. Silicone handles extreme heat better, but it usually costs more and may tear under rough installation. Thermoplastic elastomers offer clean surfaces and easy processing, although their long-term performance varies by formulation.
The profile must match the installation area. A hollow bulb profile can cushion doors and reduce wind noise. A solid edge profile suits narrow gaps and protects exposed metal. U-channels grip panel edges, while adhesive-backed strips simplify small repairs. Measure the gap carefully. A seal that is too thick can prevent the door from closing evenly. A loose profile may flutter at highway speed. I have seen installers focus on compression, then overlook drainage paths. That mistake can trap water.
Weather resistance depends on more than material names. Check temperature ratings, compression recovery, UV resistance, and chemical exposure data. Road salt, car shampoo, and engine fluids can shorten service life. Test a small section before applying a full length. Clean the surface, remove old adhesive, and press the strip evenly around corners. Avoid stretching it during installation. It may shrink later. Manufacturer test data is useful, but real driving conditions can be less predictable. A careful inspection after several weeks often reveals problems that specifications miss.
Choosing the right car seal strip starts with accurate measurement, not visual guessing. S&P Global Mobility reported that the average U.S. vehicle age reached about 12.6 years in 2024. Older vehicles often show compressed rubber, uneven gaps, and distorted channels. Measure the actual installation area before ordering a replacement.
Clean the channel first. Remove loose dirt and old adhesive. Use a flexible measuring tape for curved sections, then check straight sections with a ruler. Measure width, depth, and total length at several points.
Record the smallest channel width and depth, not the largest. A seal that looks slightly oversized may fold, twist, or prevent the door from closing.
Measure again.
SAE J1100 provides standardized vehicle dimension terminology, but it does not replace inspection of your individual door or trunk opening. Channel shapes can vary after repairs, aging, or minor impact damage.
The U.S. Department of Energy’s Vehicle Technologies Office also identifies weather and temperature as important factors in vehicle material performance. Therefore, leave a small length allowance, usually around 2–5%, and avoid stretching the strip during installation.
Cut only after a dry fit. I sometimes find the first measurement is wrong. That is normal, but ignoring it is expensive. A paper template can help confirm tight corners before adhesive is applied.
How to Choose the Right Car Seal Strip?
Evaluating Quality, Compatibility, and Long-Term Value
A car seal strip should fit tightly without forcing the door or window. Measure the channel carefully before ordering. Check the vehicle model, door position, and seal profile. Small differences can cause wind noise, water leaks, or difficult closing.
Material quality matters. Durable rubber should feel flexible, not sticky or brittle. It must recover its shape after gentle compression. In my experience, a seal that feels soft in the shop may harden after repeated heat exposure. This is easy to overlook. Look for clear material information and resistance to sunlight, temperature changes, and moisture. A reliable supplier should provide installation guidance and measurable specifications.
Tips: Clean the mounting surface fully. Remove old adhesive and dry the channel. Test one short section before installing the entire strip. Check door alignment afterward. Do not stretch the material during fitting.
Long-term value depends on performance, not just purchase price. A poor seal can increase cabin noise and allow dampness near the interior trim. It may also require replacement sooner than expected. Compare thickness, flexibility, warranty terms, and user feedback from similar vehicles. Yet reviews are not perfect evidence; installation quality strongly affects results. If the strip creates pressure marks or the door needs extra force, reconsider the profile. A slightly higher initial cost may be sensible when it prevents repeated repairs and protects the cabin over time.
Evaluating quality, compatibility, and long-term value through typical material service life
How to read the chart: Silicone and EPDM generally provide the longest service life in demanding automotive environments because of their resistance to weathering, ozone, moisture, and temperature changes. TPE offers a balanced combination of flexibility, recyclability, and cost, while PVC is often selected for less demanding applications.
The figures represent approximate industry service-life midpoints derived from commonly reported automotive material performance ranges. Actual durability depends on temperature exposure, UV radiation, chemical contact, compression, installation quality, and vehicle usage.
Selection tip: Confirm the seal strip’s profile, dimensions, hardness, adhesive system, and compatibility with the target door, window, trunk, or hood application before purchase.
WhatsApp us